
Installing E-Track is easy. It requires no special tools or skills. All you need are some fasteners and a drill, and you’re set. Like with any installation though, proper planning will make the actual installation simple and quick. Below are instructions for E-Track installation on the walls and floor of your enclosed trailer or cargo van, or along your trailer bed. (Click here for a PDF version of this guide)
Step 1: Locate Your Trailer Studs
The location of your trailer studs is the most important thing to consider when planning your E-Track installation, since E-Track is designed to attach to trailer studs.
- Find trailer studs and joists in walls and floors by checking screw patterns.
- You can also determine stud and joist placement by using a simple neodymium magnet that you can find at Home Depot.
Here’s how the stud and joist placements on a typical 5x7 trailer might look:

Once you’ve determined stud & joist placement, position your rails so that they hit as many studs & joists as possible. The more studs & joists your rails hit, the stronger your installation will be.
Step 2: Choose Your E-Track Installation Hardware
E-Track can be installed with either bolts or screws. As long as you’re hitting a sufficient number of studs, both will give your E-Track installation the maximum working load limit of 2,000 lbs.
Screws are the simplest installation method, but are not recommended for very thin mounting surfaces or if studs are spaced far apart.
Bolts will give you the strongest hold, but require access to the underside of the mounting surface.
If you choose screws, you’ll need #12 or #14 screws.
If you’re using bolts, use ¼” bolts.
Screws should be long enough to get a grip in the stud, but not too long to puncture the outer skin of the trailer. You can check ideal screw length by pulling out a manufacturer screw.

Step 3: Install the Rails
Once you’ve decided on layout and hardware, you’re ready to install the rails. All you need is a drill. Follow these simple steps and you’re on your way!
- Position the rails to hit as many studs as possible. Keep in mind that the more studs you hit, the stronger your installation.

- Cut away any trim panel so the rails lay flush against the walls.

- Screw or bolt the rails to the trailer wall or floor studs.
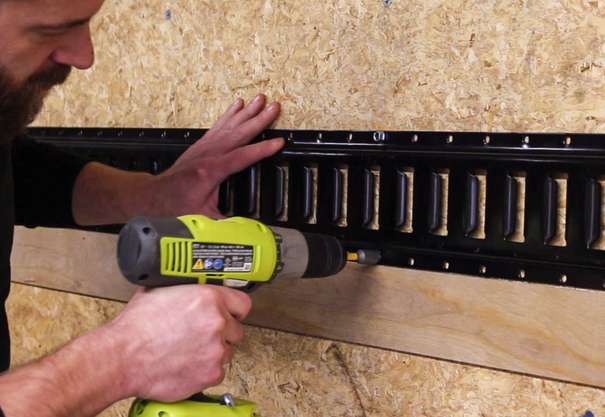
- Fill in a fastener every 8-10” between the studs.

Additional E-Track installation tips:
- If you’re installing the rails onto an aluminum trailer, use a separator to prevent corrosion from dissimilar rails. Use a rubber pad cut to size or some bedliner.
- If your trailer walls are very thin, reinforce the walls by layering a large piece of 3/4” plywood over where you plan to install the rails. Fasten the reinforcement plywood to the studs and wall in as many places as possible.
- If your trailer studs are very far apart, use E-Track backing plates every 2-4 feet to strengthen the installation. (Backing plates act as oversized washers that disperse the weight of the installation over a wider surface area and strengthen the installation.)
Cutting E-Track
- If needed, E-Track can be cut to fit any length. Use a metal saw or cutting wheel. You can use end caps to protect feet and cargo from sharp edges.


